

🔑 In 7 minutes you will learn:
- The basics of deep learning
- The necessary steps to develop a model with deep neural network architecture
- Coding examples in Python 3
We will start off with its basics and then build on that to dive deeper into more complex structures. During the transition from simple to complex, we will discuss why the need arises for the use of deep networks, and the shortcomings of the simple/ naive ones. We will also see coding examples in Python 3 using popular frameworks like Tensorflow to get a better understanding of the concepts we cover. So, let’s start!
To follow this article, you should have some prior basic knowledge of Machine Learning including Neural Networks, as well as basic programming knowledge in any language (preferably in Python). Other than that, the rest of the article is beginner-friendly.
Deep Learning, as stated previously, is a branch of Machine Learning which deals with handling complex datasets. The intriguing thing about it is that it uses the same methodology that our brain uses to learn new things i.e. through Neural Networks. Let us see what a Deep Neural Network looks like:
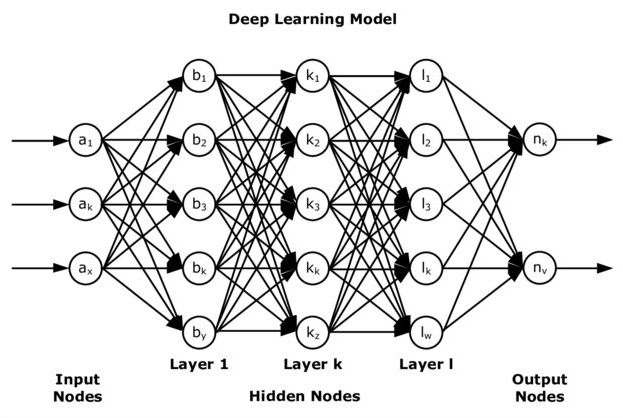
Scared? Don’t be. We’ll go through it part by part and through questions. So let us start with the first layer i.e. Input Nodes.
How do we decide the number of neurons in the first layer?:
It depends on the features of your dataset. If you’re feeding a text or numerical data in your network, the number of neurons would be equal to (the number of columns — 1) of your dataset; the column that is skipped is the Class or Labels column that holds the values for each record that you wish for it to predict. Similarly, if you’re feeding the image dataset to a neural net, then the number of neurons in the hidden layer would be equal to the dimensions of the images in the dataset. For instance, all your images are of dimension: 10 x 10. Then, the number of neurons would be 100.
What are hidden layers and how many layers do we add?:
Hidden layers are there for the neural network/ model to learn features in your dataset. You cannot know what feature each layer or neuron is learning, that is implicit. For a Deep Neural Network, there must be two or more hidden layers, otherwise, it would be considered a shallow neural network. Ok, so we have established that we need two or more layers, how do we decide the exact number? And the number of neurons in each of these hidden layers? Well, that is decided through the hit and trial method, or you can use Grid Search algorithm to find the best values for you. If your dataset is small and the features it contains are simple, you should go with a smaller number of layers, if it’s large and complex, then the number of hidden layers needs to be increased as well as the number of neurons in each.
The next thing we need to learn is how to develop a model that makes uses of a deep neural network. The steps are mentioned below in sequence:
- Load the dataset into your program
- Split your dataset into a training set and test set. The ratio is usually 70:30 i.e. you use 70% of your dataset for training and the remaining 30% for testing
- Preprocess your dataset to convert it into a format that can be fed into your deep neural network
- Define your Deep Neural Network’s architecture, i.e. how many layers it would have, the number of neurons in each layer, etc.
- Compile your model i.e. combine all the layers you have defined in the step above into a single model instance/ object
- Train/ fit your model on the training dataset
- Evaluate your trained model on the testing set to see how it would perform on data that it has never seen before
So, what are you waiting for? Let us jump right into it and get our hands dirty with some code.
In this example, we are going to work on the Sentiment Labelled Sentences Data Set. You can download it by clicking.
This is a dataset that contains user reviews from different websites including IMDB and yelp. In our example, we are only going to use the data from IMDB; it’s very small so the accuracy will be poor, but we would be able to go through all the steps we defined above on this dataset. It has two columns, one is the content of the review, and the second column represents the overall sentiment of that comment, as either positive (1) or negative (0).
So, let’s start!
Note:
Our focus point here is the deep learning part, not the parts before it. We will cover the other steps, but we won’t go into their detail. Furthermore, this tutorial is aimed towards getting you started on Deep Learning and give you a good idea of it, therefore, the minor parts would not be considered in too much detail.
# Step 1: Load the dataset
import pandas as pd
df = pd.read_csv ('imdb_labelled.txt', names= ['sentence', 'label'], sep = '\t')
Next, we will split our dataset into training and testing set with a 70 to 30 ration.
# Step 2: Split dataset into training and test set
print(df.shape) # to see the number of records and columns/ features in the dataset
from sklearn.model_selection import train_test_split
X = df['sentence'].values
Y = df['label'].values
X_train, X_test, y_train, y_test = train_test_split(
    sentences, y, test_size = 0.30, random_state = 10)
Next, we will preprocess our dataset before feeding it into the model.
# Step 3: Preprocessing the dataset
from sklearn.feature_extraction.text import CountVectorizer
vectorizer = CountVectorizer()
vectorizer.fit (X_train)
X_train = vectorizer.transform (X_train)
X_test  = vectorizer.transform (X_test)
And here comes the important part. We are now going to define our deep neural network’s architecture, layer by layer, and then compile it.
# Step 4: Define the model
from keras.models import Sequential
from keras import layers
input_dim = X_train.shape[1]  # Number of features
model = Sequential()
model.add(layers.Dense(5, input_dim = input_dim, activation = 'relu'))
model.add(layers.Dense(5, input_dim = input_dim, activation = 'relu'))
model.add(layers.Dense(1, activation = 'sigmoid'))
# since our output is just 0 or 1 to represent positive or negative
# sentiment, we only have 1 neuron in the last/ output layer
# Step 5: Compiling the model
model.compile(loss = 'binary_crossentropy', optimizer = 'adam',
                metrics = ['accuracy'])
model.summary()
Output:
| Layer (type) | Output Shape | Param # |
| dense_4 (Dense) | (None, 5) | 12975 |
| dense_5 (Dense) | (None, 5) | 30 |
| dense_6 (Dense) | (None, 1) | 6 |
| Total params: 13. 011
Trainable params: 13, 011 Non-trainable params: 0 |
||
Now, we’re headed towards the last two steps of our application. We will first fit our model onto the training set, and then evaluate it on our test set. So lets do that and see what’s the accuracy we get on our testing set.
# Step 6: Fit the model on training set
model.fit(X_train, y_train, epochs = 100, verbose = False,
        validation_data = (X_test, y_test), batch_size = 10)
# epoch means the number of times the model should iterate over the training set
# Step 7: Evalute the model on testing set
loss, accuracy = model.evaluate(X_test, y_test, verbose=False)
print("Testing Accuracy:  {:.2f}".format(accuracy))
Output:
Testing Accuracy: 0.78
Well, accuracy is actually quite good. But you shouldn’t expect that to be the case in your first try. The hyperparameters i.e. the number of layers and the number of neurons in each have currently been selected out of pure instinct and it is highly unlikely that these are the ones that give the best accuracy on this dataset. Usually, Grid Search is performed to find out the optimum hyperparameters. So, it’s highly likely that if we applied that on our model, we would easily get accuracy above 80%. Pretty cool, right?
Most times, it is always hard to gather enough data to have your own algorithm trained and tested. Therefore, it is often more efficient to find another service that does laborious works for you. We could be your perfect solution!
Here at DATUMO , we crowdsource our tasks to diverse users located globally to ensure the quality and quantity on time. Moreover, our in-house managers double-check the quality of the collected or processed data. Let it be your professional dataset or academic dataset. We are here to help!
To sum it all up, we started off by getting an introduction to what deep learning is and went on to discuss what we need to know before we jump into this domain. Later, we covered some common questions, the answers to which help us understand better what deep learning is. After that, we discussed the common steps in basic to intermediate Machine Learning applications that make use of deep learning. Lastly, we applied our knowledge and steps on a real dataset to make a model using a deep learning architecture.