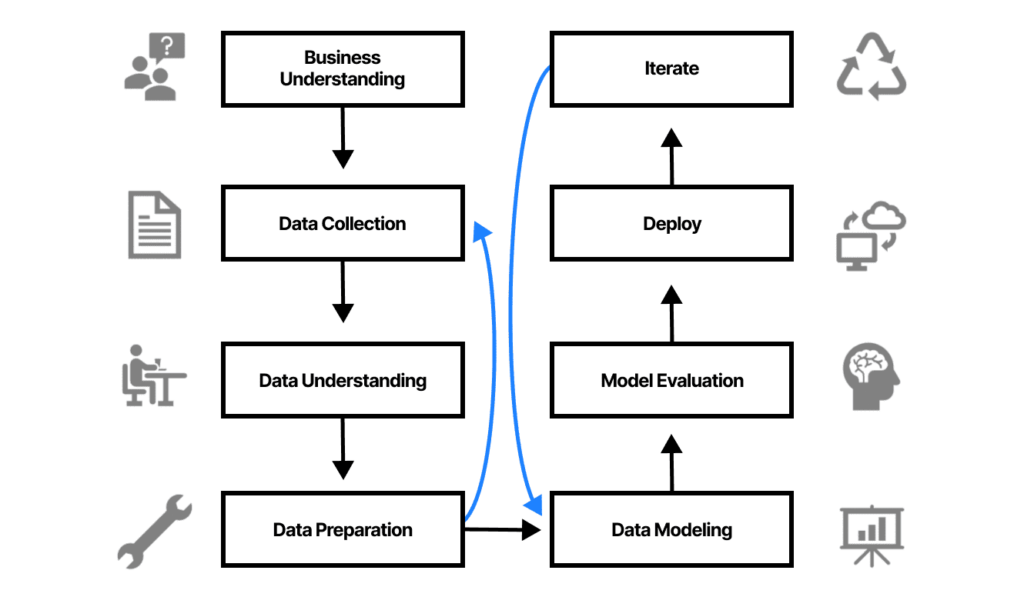
Furthermore, since we are talking about image labeling, it is implicit that we are going to talk strictly about the Computer Vision domain of Machine Learning and ignore textual data completely. Now, before we can get on to that, it is important to know what a Data Science Project’s lifecycle is. So let’s start with that!

As you can see above, after understanding and defining your problem statement, the first three steps to initiate your project revolve around ‘Data’. In the first phase, i.e. Data Collection, you either scrape images from the Internet or collect them yourself through a camera. Image labeling falls in the second phase i.e. Data Understanding because this is where you are providing information / description to your model so that it can understand what the data represents. The third phase i.e. Data Preparation is where you process your images to convert them to a format in which they can be easily fed to your model, and also ensure consistency in the dataset — for instance, all images should have the same dimensions (64 x 64). This is all you need to know about the lifecycle, understanding the other phases is not relevant for this tutorial.
Application
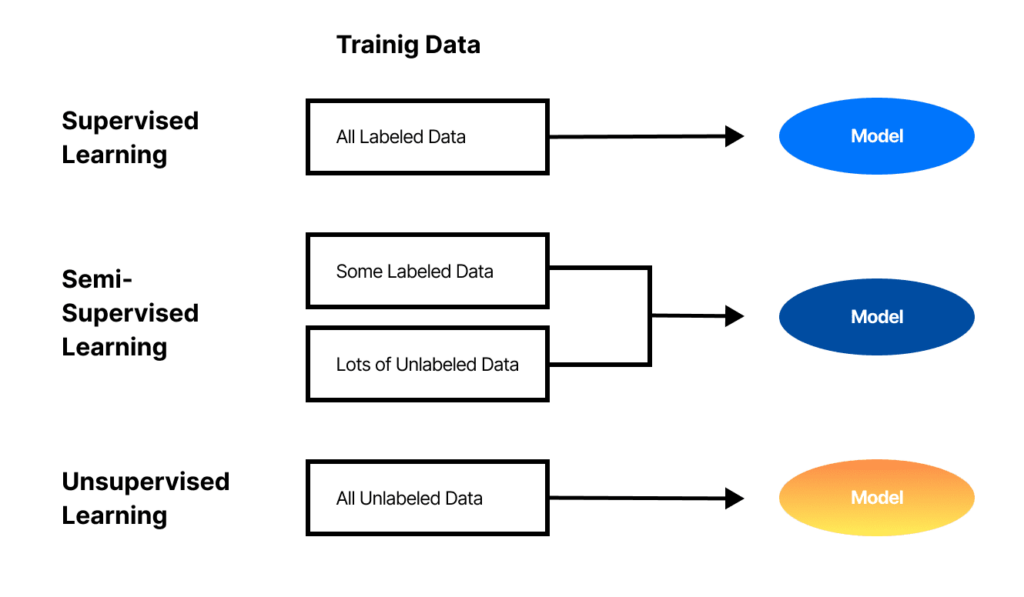
To discuss the applications of Image labeling, we need to know the types of learning in Machine Learning and in which types exactly is image labeling important. For that, see the image below:

Supervised learning is when you first train your model on a set of labeled data i.e. let it practice on some data for which you already know the answer. Think of it as doing practice questions before an actual exam (you have the solutions for the practice questions). Semi-supervised learning is similar to that as well, except that we introduce some unlabeled data as well and let the model train on a mixture of both. Unsupervised learning is where you let the model find meaningful patterns in your unlabeled dataset. As you probably would have guessed by now, image labeling is only relevant/ important when you are either performing supervised learning or semi-supervised learning. It plays no role whatsoever if you are going for unsupervised learning.
Image labeling happens to be one of the starting processes in a computer vision application. It is divided into two main categories:
Labeling for Image Classification
Image classification is a basic application of computer vision where we classify images into different categories. For instance, let us consider a cat vs dog classifier — what it would do is if we give an image as input, it would tell us whether the given image is a cat image or a dog image. To build this classifier, the first thing we would need is a labeled dataset (that’s the only part we are going to talk about, let us ignore the machine learning/algorithm part for now). To construct this dataset, we would need to collect thousands of cat & dog images and then rename those files with either cat label or dog label. Once we have done that, we would feed it (i.e. the dataset) into the model for training. This is all you need to know as far as image labeling is concerned.
Labeling for Object Detection
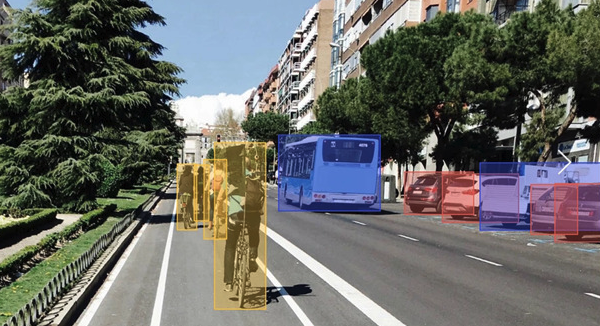
Object Detection is a comparatively complex application of computer vision that requires a more sophisticated kind of image labeling. For instance, let’s consider an application that detects cats and dogs in an image and draws a bounding box to identify wherein the image is/are the cat(s) or dog(s). To differentiate between the above application from this one, think of it like this: In classification, we assign a single label to the whole image; whereas, in object detection, we label parts of an image with different labels. To elaborate further, in object detection, a single image could contain one or more cats AND dogs; hence, a single image would have multiple labels.

Bounding box captures the position of an object in an image by drawing a box around that object and noting down the spatial coordinates of the edges of that box. This is an image that shows how bounding boxes are drawn on an image to label motor vehicles.
//squares

"squares": [{
"coordinates": {
"xmin":0.30,
"ymin":0.04,
"xmax":0.71,
"ymax":0.59,
},
"label":"car"
}]
This is a sample XML file showing how the information of a bounding box is stored.
Importance of Labeling
The fact that a labeled dataset is the input to your machine learning model is in itself a strong indicator of the importance labeling holds for your deep/machine learning model. If the dataset is not accurately labeled, the accuracy of your model will suffer, no matter how state-of-the-art your model’s architecture is. I have seen it a few times in my own professional experience as well that engineers have had to go back to the data labeling phase after getting poor accuracy from the model(s) they use; hence, wasting a lot of project resources in terms of time as well as costs. Therefore, it is important to give this phase due time and diligence to ensure the success of your project.
Tools
By now, we have learned pretty much all the background knowledge we need to have about image labeling, so lets now move to the last step i.e. learning how to gather a labeled dataset. The most convenient way is to find a public labeled dataset online which is fit for your application; however, more times than not, such a dataset doesn’t exist. The second approach is to make use of crowdsourcing platforms and incentivize its users to collect and label the dataset for you. For instance, say you want a labeled dataset of pens, laptops and mobile phones — you can ask people to take pictures of any of these things and submit them in a Cloud Storage folder to get some rewards. However, this approach would only work if you’re labeling images for classification; you cannot expect or even trust people to draw accurate bounding boxes on these images. For those who cannot afford these options and are an individual who is building an application for research purposes or for your own interest, worry not! There are many tools available for labeling images yourself such as Colabeler and LabelImg; they are the two most popular ones that I, too, have used and found to be quite user-friendly.
Moreover, one of the best ways to handle all these burdens is to hire a professional team to do the task for you; DATUMO is your best solution! Here at DATUMO, we crowdsource our tasks to diverse users located globally to ensure the quality and quantity on time. Moreover, our in-house managers double-check the quality of the collected or processed data.
To sum it all up, we discussed the ‘Data’ related steps in a Data Science Project’s lifecycle, uncovered the importance of image labeling in computer vision domain of Machine Learning, learned about the types of image labeling and when each is used, and lastly, we talked about some popular tools that are most frequently used for doing this task. After following this tutorial, you should be able to annotate your image datasets with good accuracy, keeping in mind the role it would play in increasing or decreasing your deep learning model’s accuracy.


